Drawing skulls is a fascinating and challenging aspect of artistic expression. Whether you’re an aspiring artist or a seasoned professional, mastering the art of skull drawing can significantly enhance your skills and artistic repertoire.
This comprehensive guide will walk you through the process, from basic techniques to advanced concepts, helping you create stunning and realistic skull drawings.
The Basics of Skull Drawing
Before diving into the intricacies of skull drawing, it’s essential to understand the fundamental principles that govern this art form. Skull drawing requires a keen eye for detail, a solid grasp of anatomy, and the ability to translate three-dimensional forms onto a two-dimensional surface.
The human skull is a complex structure composed of numerous bones, each with its unique shape and function. As an artist, your goal is to capture the essence of this intricate form while imbuing your work with emotion and character.
To begin your journey in skull drawing, familiarize yourself with the basic structure of the skull. Study its proportions, the placement of key features such as eye sockets, nasal cavity, and jaw, and the subtle curves and angles that define its shape. This foundational knowledge will serve as the cornerstone for all your future skull drawings.
Step-by-Step Guide
Now that we’ve covered the basics, let’s delve into a step-by-step guide to help you create a compelling skull drawing.
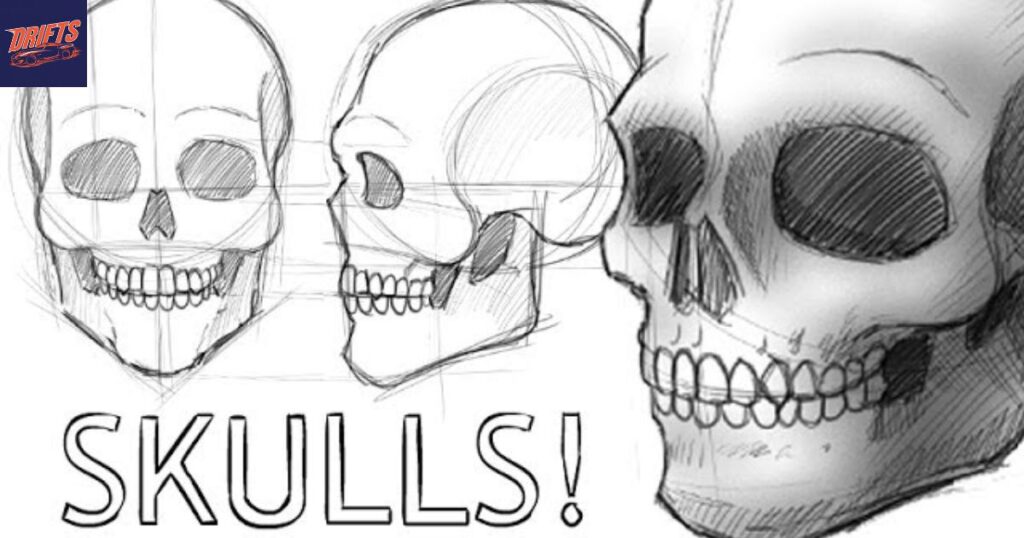
Step 1: Basic Outline
Start by sketching a loose outline of the skull. Focus on capturing the overall shape and proportions rather than getting bogged down in details. Use light, fluid strokes to create a general form that will serve as the foundation for your drawing.
Begin with a large circle for the cranium and add a smaller, attached shape for the jaw. This simple structure will guide you as you refine your drawing. Remember, at this stage, precision is less important than establishing a solid framework.
Step 2: Defining the Features
With your basic outline in place, it’s time to define the key features of the skull. Start by adding the eye sockets, which are typically large and almond-shaped. Next, sketch in the nasal cavity, paying attention to its triangular form and how it connects to the eye sockets.
Move on to the cheekbones, which give the skull much of its character. Draw them as sweeping curves that extend from the eyes to the sides of the skull. Finally, add the jawline, ensuring it aligns properly with the upper portion of the skull.
Throughout this process, continually step back and assess your work. Make adjustments as necessary to maintain proper proportions and symmetry.
Step 3: Adding Detail
Now that the main features are in place, it’s time to add the finer details that will bring your skull drawing to life. Focus on the intricate sutures that connect the various bones of the skull. These lines add texture and realism to your drawing.
Pay close attention to the teeth, carefully rendering each one with consideration for its shape and placement. Add small imperfections and variations to make the skull appear more natural and less formulaic.
Don’t forget to include the small foramina (holes) that are present in various parts of the skull. These subtle details can greatly enhance the realism of your drawing.
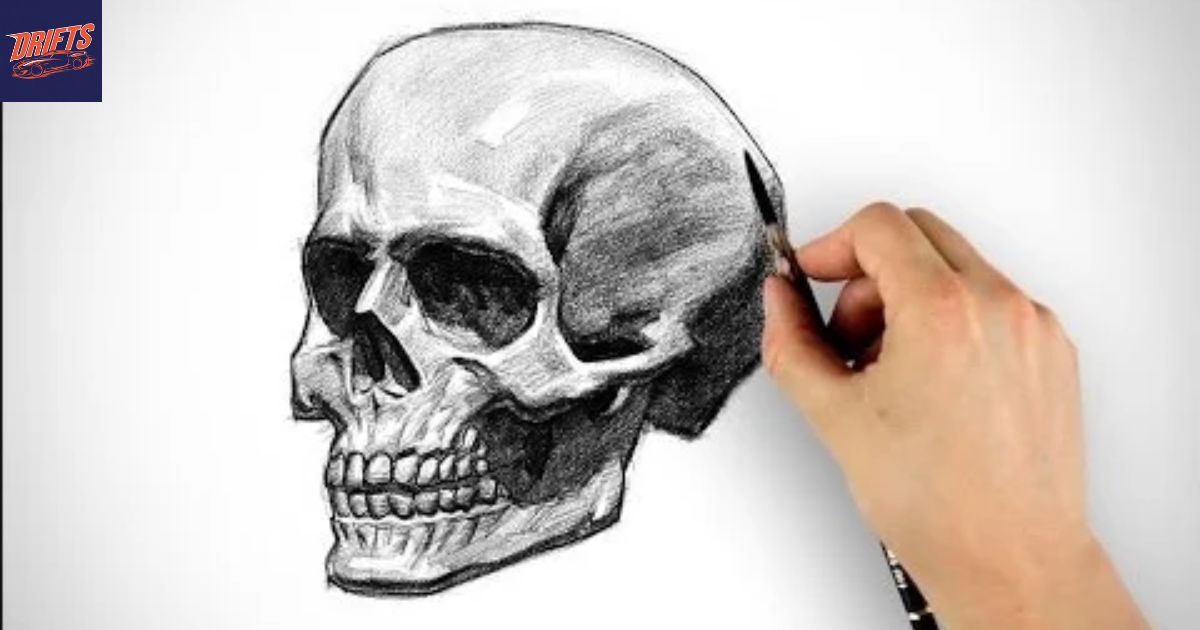
Step 4: Shading and Texturing
The final step in your skull drawing process is adding shading and texture. This is where your drawing will truly come to life, gaining depth and dimension.
Begin by identifying your light source. This will determine where the highlights and shadows fall on your skull. Start with broad areas of light and shadow, gradually building up the values to create a sense of form and volume.
Use various shading techniques such as cross-hatching, stippling, or smooth blending to create different textures. Pay attention to how light interacts with the different surfaces of the skull – the smooth, reflective areas of the teeth versus the more porous texture of the bone.
Tips for Realistic Skull Drawing
To elevate your skull drawings from good to great, consider the following tips:
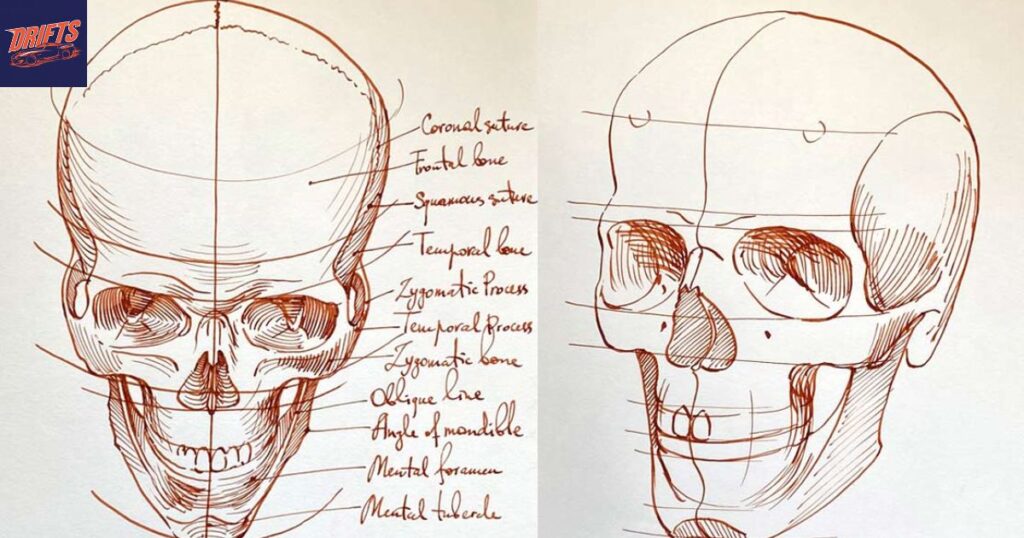
Understanding Skull Anatomy
A deep understanding of skull anatomy is crucial for creating realistic drawings. Study the individual bones that make up the skull, their shapes, and how they fit together. Pay attention to the subtle variations in texture and form across different areas of the skull.
Learn about the sinuses, foramen magnum, and other internal structures. While these may not be directly visible in your drawing, understanding their presence can inform how you render the external features.
Read This Blog: Tech Games Defstartup: Innovate & Win Games to Flourish Your Startup
Practicing Proportions
Accurate proportions are key to creating a believable skull drawing. Practice drawing skulls from various angles to develop your understanding of how the proportions shift in different perspectives.
Use measurement techniques such as comparing the sizes of different features relative to each other. For example, the distance between the eyes is typically about the width of one eye.
Experimenting with Styles
While mastering realistic skull drawing is important, don’t be afraid to experiment with different styles. Try stylized interpretations, abstract representations, or incorporate skulls into larger compositions.
Explore various mediums such as charcoal, pen and ink, or digital tools. Each medium offers unique possibilities for texture and detail in your skull drawings.
Common Mistakes to Avoid
Even experienced artists can fall prey to common pitfalls when drawing skulls. Being aware of these mistakes can help you avoid them and improve your work.
Incorrect Proportions
One of the most common mistakes in skull drawing is getting the proportions wrong. This can result in a drawing that looks off or unrealistic, even if the individual elements are well-executed.
To avoid this, constantly compare the sizes and positions of different features as you draw. Use guidelines and measuring techniques to ensure your proportions are accurate.
Overlooking Details
While it’s important not to get lost in minutiae, overlooking key details can significantly impact the realism of your skull drawing. Pay attention to small features like the zygomatic arch, mastoid process, and the subtle curves of the cranium.
Don’t forget to include the small imperfections and asymmetries that exist in real skulls. These details add character and authenticity to your drawing.
Ignoring Light Source
Failing to establish and maintain a consistent light source is a common mistake that can undermine the three-dimensionality of your drawing. Always be aware of where your light is coming from and how it affects the shadows and highlights on the skull.
Remember that different parts of the skull will reflect light differently. The smooth surface of the teeth will create sharper highlights than the more matte texture of the bone.
Advanced Techniques
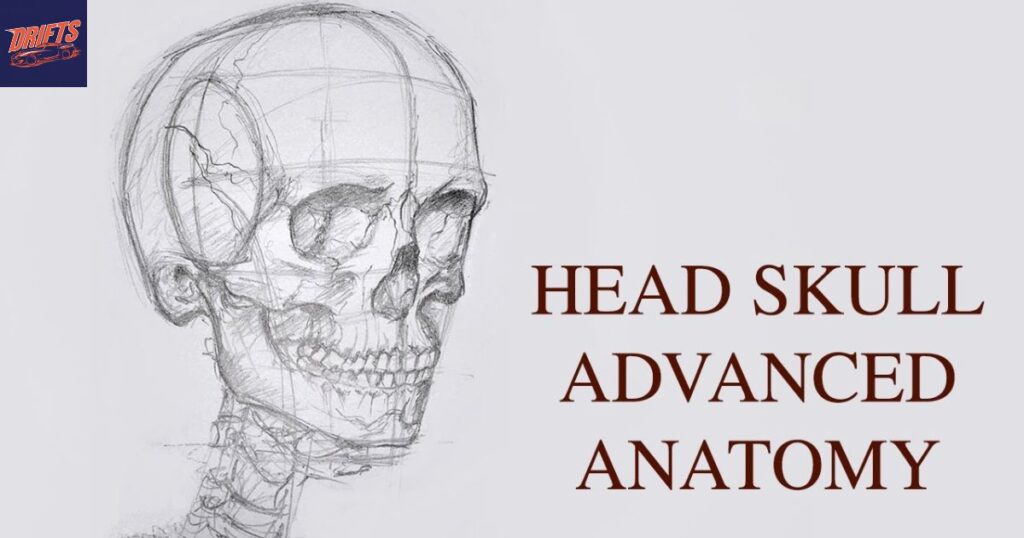
As you become more comfortable with basic skull drawing, you can explore advanced techniques to take your art to the next level.
Using Reference Images
While it’s valuable to practice drawing from imagination, using reference images can greatly improve the accuracy and realism of your skull drawings. Look for high-quality photographs or 3D models of skulls from various angles.
Consider creating a reference board with images of skulls in different lighting conditions and from various perspectives. This can be an invaluable resource as you work on more complex drawings.
Read This Blog: Connie Kline: A Comprehensive Look at Her Life, Career, and Relationships
Exploring Creative Variations
Once you’ve mastered realistic skull drawing, explore creative variations. Try drawing animal skulls, fantasy creatures, or combine human and animal skull features to create unique hybrid designs.
Experiment with adding decorative elements to your skull drawings, such as floral patterns, geometric shapes, or cultural symbols. This can add an extra layer of meaning and visual interest to your work.
Incorporating Symbolism
Skulls have been used as powerful symbols throughout art history. Consider incorporating symbolic elements into your skull drawings to convey deeper meanings or emotions.
Explore how different cultures and artistic traditions have used skull imagery. From Mexican Day of the Dead celebrations to Baroque vanitas paintings, there’s a rich history of skull symbolism to draw inspiration from.
FAQ’s
How long does it take to master skull drawing?
Mastering skull drawing varies for each individual, typically requiring months to years of consistent practice.
What’s the best medium for beginners in skull drawing?
Graphite pencils are ideal for beginners due to their versatility and ease of use.
Can I learn skull drawing without studying anatomy?
While possible, studying anatomy greatly enhances your understanding and improves your skull drawings.
How do I add personality to my skull drawings?
Incorporate unique textures, stylistic choices, or symbolic elements to infuse personality into your drawings.
Are digital tools good for learning skull drawing?
Digital tools can be excellent for learning, offering features like layers and easy corrections.
Conclusion
Mastering the art of skull drawing is a journey that requires patience, practice, and passion. By understanding the fundamentals, avoiding common mistakes, and continually challenging yourself with new techniques and styles, you can develop your skills and create truly captivating skull drawings.
Remember that every artist’s journey is unique. Embrace your individual style and use these guidelines as a foundation to build upon. With dedication and perseverance, you’ll find yourself creating skull drawings that not only showcase your technical skills but also express your artistic vision.
Whether you’re drawing skulls for anatomical study, artistic expression, or as part of larger compositions, the skills you develop will enhance your overall artistic abilities. So grab your drawing tools, find some inspiring references, and start exploring the fascinating world of skull drawing.

Hello!
I’m Areej, a passionate blogger with 5 years of experience. I love writing about tech, fashion, business, and health. My goal is to share useful information and insights with you. Explore my website to discover exciting content on various topics!